Wednesday, March 30, 2011

I'm STILL obsessed with my coffee filter wreath... and my photo wall.

I've ALWAYS wanted to do a photo collage wall.  Always.  I know this isn't ground breaking or anything, but... I've started.   (Plus it's another chance for me to photograph my coffee filter wreath that I'm still obsessed with).


Notice Cole's contribution to our decor....

Now I'm stalled because I know I have a large box of black frames back in Syracuse so I don't want to BUY more.

Anyway-- I'm super excited because I see good things are happening.  Next steps.

Step 1:  Get black frames from Syracuse (quite possibly happening in 2 weeks)

Step 2:  Find photos to go in black frames.  (I have been working on this already because I can size them to fit the frames when I decide what frames to use)

Step 3:  Frame photos in said black frames (can't wait to get to this step!)

Step 4:  Hang framed photographs


If necessary add "filler" pieces to photo wall as well.

Here are a few inspiration walls that I'm looking at.
photo credit:  primed 4 design

And these from Young House Love:  I probably should have used this "template" trick, but I got too excited.  I guess we'll see what happens once I get the rest of my frames together...
 Template(s) above.  Final frame layout below.


I'll keep you posted on my progress because I know you're all on the edge of your seats. :)

Friday, March 25, 2011

I Can't Stop Cutting Up Old T-shirts!

Well... to be honest, these were the first projects I made with old t-shirts so this post is very overdue.  And if you're my friend of facebook, you've already seen these (sorry), but I'm going to link to a 'How To' if you want to make your own.

Here are two necklaces I made using my husband's old t-shirts that he was looking to give away.  (please disregard the poor nature of these photos-- they were taken at the beginning of my "learning to take photos for my blog" adventure-- sorry-- but you get the idea)

The beauty of these is that they were totally FREE to make.  I already had the t-shirts, the chains that I used were old necklaces that I no longer wore, the beads in the white necklace were from an old bracelet that had broken and the felt that you need (see tutorial) I had left over from a craft that I did years ago.  It was bright yellow, so I had to do a bit more "disguise" work with it in the end, but... it totally worked.

 
I then went on to make a TON of black , white and grey little pom-pom pins for family for Christmas-- they were great , cute little gifts for all the women in the family.  With my husband's 6 sisters, 4 sister-in-laws,  (he's 1 of 11 children-- crazy?--I know! Awesome?--Absolutely!!), and his step-mother, PLUS my sister, my mother, my Aunt and Grandmother, I made a LOT of these pins.  Once the cutting is done (which is total brainless work), they really go quite quickly-- I did 20 (I think) in a couple of hours (cutting time included).

AND because I wasn't quite sure how the project would go (and it was my first real crafting project in quite a while), I didn't create my own tutorial so.... I'll share the love.  I followed this tutorial from Little Miss Momma-- the cutest blogger out there- seriously check her out-- she's adorable!

And if you make one of these necklaces, let me know-- I'd love to see it!

Monday, March 21, 2011

March Madness (cheapskate style)

Did you know that the S.U. Orange mascot is named "Otto" ?
In our house we’re Syracuse University basketball fans!  Especially since we’re not in Syracuse anymore, I feel like I need a way to show my school support during the NCAA tournament, without being TOO obvious.

Enter this cool idea that I found for making necklaces out of my new favorite medium—t-shirts.  It wasn’t my plan all along to make an SU necklace—it just sort of happened.  I was in the dollar store, looking for a couple of glass vases to make another pair of hurricanes for my sister, when I walked by a bin of t-shirts, and right on top—the prefect orange t-shirt.  And in the other corner of the bin—the prefect blue t-shirt.  It was like it was fate, so I bought them knowing I’d find a fun craft to do with them to show my SU pride.
I was slightly worried that this particular project wouldn’t work because the t-shirts were different sizes, but…. I was wrong—it worked just fine!
Here is my new SU necklace.

And here’s how I did it.

Lay the t-shirt out flat on a flat surface.  You need to make sure it’s pretty straight and that the edges line up together.  If you were smart, you’d probably iron the shirt flat, but… well… I don’t iron unless I absolutely HAVE to.

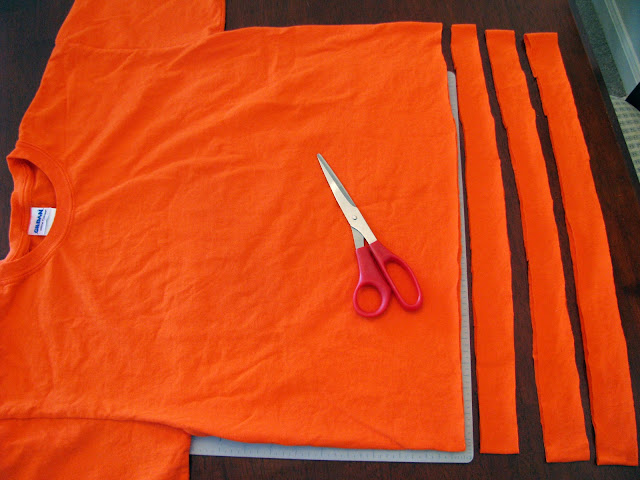
First you have to cut off the bottom hem of the t-shirt(s).
Then cut 1 to 1 ½ “ strips straight across the body of the shirt (cut through both layers at once)—these will create large loops (that is what you want).
They don’t have to be perfect (thank goodness) because when you stretch them they will roll up and you’ll never know.
Try not to pull at the material too hard as you’re cutting/working with it because before the next step you want to have flat (not rolled) strips of fabric.
FYI:  I cut 6 or 7 strips to make one necklace.  You can experiment with number of strips for a thinner or fuller necklace.  As you can see-- it leaves a lot of extra fabric for more projects!!
Once you’ve cut all your strips, gather them together and put your hands trough each end of the loop.  Do all strips together at the same time.  Then you’ll stretch them out and the fabric will roll under itself- creating these little “tubes”.  (Note:  the following photos are for show only)
Also of note, the t-shirt tubes roll "inside out", so if you have an old t-shirt with a pen mark or small stain on it, you might still be able to use it for this type of project because it's actually the wrong side that you see. (and why it probably wouldn't work well with a patterned t-shirt)
 The reason you want to stretch all of your strips at the same time is so that they all end up the same length.  This is especially important if you’re using t-shirts of different sizes.

Aaannnndddd….. that’s it.  It literally takes 5 minutes to make this necklace.


And you can experiment with different ways to wear the necklace.

Wear it long.
Wear it doubled up for a shorter/fuller look.
You can also try various knots etc.  I’m tempted at some point to try braiding the fabric tubes (cutting one end so that it becomes 1 long straight tube) to see if that’s at all interesting.  If I do it, I’ll be sure to let you all see the finished product.

And sometimes you just have to be a little more ‘in your face’ with your support of your team….
Go Orange!


edit:  SU just lost.  (and this post was supposed to happen yesterday when the game was on, but my internet was all wonky yesterday) Guess I'll have to put away my new necklace until next year....

Sunday, March 6, 2011

Conversations with a Cheapskate.

Here's what happens when you come across someone who is feeling a little stressed but who loves to plan parties AND is a cheapskate.  Conversations like this may or may not take place (mostly in my head--ok- and a little bit out loud too).

Friday night:

"I need some wine.  Not good wine, just something to take the edge off.  They run about what... $8 - $9/bottle?-- I can swing that.  I could totally use some wine right now."

Enter liquor store:

"Here's the kind I usually get-- $8.99 for the 1.5L bottle.  Nice!  Love me some cheap wine."

On the way to the counter with said bottle in hand says (out loud).

"Oh wait... what's this???  Look at THIS bottle!  So cute!  AND only $6.99 for the 1.5L bottle!"

Picks up bottle.  Husband rolls eyes and leaves store.

"I bet the wine tastes like crap, but the bottle... so cute!!"

Reaches the register.

Places the $6.99 bottle of wine on the counter (and a bottle of something else for the husband since I know he won't drink my crappy wine).  Total:  $17.98.  Score!  It's gonna be a good weekend! (how sad)

But seriously-- look how cute this bottle is.

I have big plans of doing a Cookies and Milk party like this someday (yes, I know it's a first birthday party, but I love the concept of it for an 'anytime' party).
image credit:  Kara's Party Ideas
These bottles would be so cute for holding milk (and chocolate milk).  Best of all-- I'm not spending money on JUST the bottle.  I get crappy wine too!  (remember I'm not a fancy eater - or drinker for that matter).  For a party I would obviously take off the wine bottle labels and I think I would cut a circle out of a coordinating scrapbook paper to paste over the lid.


I think those directions (above) are HILARIOUS!  They're so specific.


 And the description on the back makes me laugh too.  If you can't read it it says:

"Serve this refreshingly crisp, fruity wine chilled.  Great by itself or with white meat, poultry, seafood, lightly flavored or spicy dishes, and cold cuts."  

Cold cuts?  Really?  I guess this wine KNOWS it's not very good.


Anyway.... I can't wait to do a Cookies and Milk party someday-- I'm thinking it would be a January or February party and I would serve a bunch of different types of cookes, milk, chocolate milk, and hot cocoa with different toppings like whipped cream, marshmellows, peppermint sticks, candy coated spoons and some Bailey's for the adults.  Mmmm....
image credit:  Kara's Party Ideas
And then after the party, I think the bottles would also make cute vases for cut flowers - tulips is what I'm envisioning right now-- c'mon Spring!!
image credit:  Design Sponge
I guess I'll need to get another couple bottles of crappy wine for the party that I might have someday.  Oh... and the wine... it was REALLY bad-- like rubbing alcohol bad.