Showing posts with label spray paint. Show all posts

Sunday, October 2, 2011

Office Makeover Breakdown: Flower Vase

Wanna know what my flower vase looked like before I put it in my cubicle?

actually it only looked like ONE of these (but I happened to buy and photograph 2)
I found these plastic vases at Big Lots during an end of summer clearance event.  They were $.50 each so I bought 2 because I loved their shape.

this angle-- looking down INTO the pot, gives me even MORE ideas


A little white glossy spray paint,  a couple of stems of Dollar Tree "flowers" and Voila!


Project costs breakdown:

Vase:  $.50
Spray Paint:  $4.47 (Krylon Fusion -- for plastics)
Flowers:  (3) stems at $1 each = $3.00

Total cost:  $7.97

The most expensive update to my desk, but I love the impact that it has!


Thursday, August 4, 2011

I'm guest posting at Thrifty and Thriving!!

I cant' even stand it!  You know how I talk A LOT about one of my other favorite blogs  - other than my own of course ;)  Well, when Christy at Thrifty and Thriving asked me to guest post on her blog I jumped at the chance.  I am soo excited-- see... told ya' I was famous!

Check it out-- I'm sharing a cute way to use your old junk-- namely those wire hangers that add up a little too quickly for my liking.

Oh and while you're there-- say 'Hi' to Christy for me- and tell her you came from Confessions of a Serial Cheapskate!

Sunday, July 17, 2011

I have an addiction to post holiday sales.

Shortly following all the major holidays, leftover holiday merchandise goes on sale.  I'm sure this is not big news to any of you.  Most of the time it's kind of the dregs of the holiday stuff that nobody really wants or needs OR it's like 1 set of 10 cute beverage napkins that don't really cut it (you almost always need more than 10 - especially when you're talking beverage napkins).

After Easter this past year I checked out some of my favorite post-holiday-deals-shopping spots and found that it was mostly candy and plastic eggs that were left over.  God knows I don't need any candy in the house and I have PLENTY of plastic eggs (considering the ones from our attic in Syracuse haven't made it here yet so I had to buy all new eggs this year).  

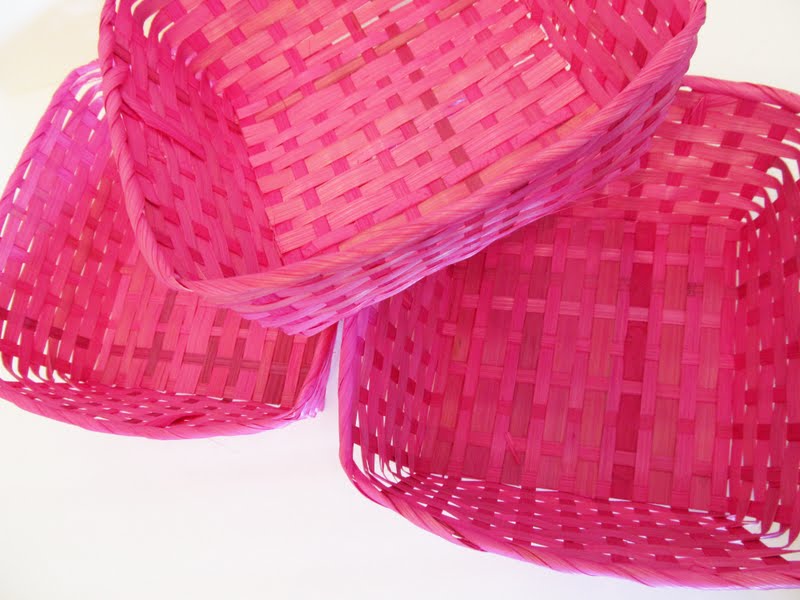
However,  about a month after the sale (you know it is junk when it's still there a MONTH after the holiday), these cheesy easter baskets were still on the shelf, but marked down to $.10 each.  I knew I could do something with these (and secretly hoped I had a little girl that I could do something for because the hot pink color was great).

So... I took these (3 of them):
 and turned them into these (for the 4th of July):
(not so sure about the liners anymore...)

It was a pretty simple process-- take off the handles and spray paint the baskets.  
Some of the handles pulled out easily (remember they are REALLY cheesy)
Some required a little more work:
used a paring knife to loosen the weave to release the handle
But very quickly I had 3 square baskets without handles.  

Then came the spray painting.  (and yes-- I used the cheap stuff-- I think it's $1.97 a can at Walmart.  For anything better than $.10 Easter baskets I might have sprung for more expensive paint, but I figured I didn't have much to loose with these if it didn't come out great)
I knew the white one would take the most time/paint, but... holy cow-- it was kind of ridiculous.  I lost count as to how many coats I used.  Maybe 5?  Maybe more.  Could still probably use one more coat to get a crisp clean white, but spray painting is not so easy in an apartment complex without much private outside space.

First coat.  I was trying to do the right thing and do the "do multiple light coats instead of one heavy coat" technique.  As you will see-- that technique didn't last long.

Then the red (first coat):
And the blue covered VERY well with it's first coat. 
Second Coat.  See much of a difference.... Didn't think so.
For someone who doesn't like feet much, my feet seem to be in a lot of posts lately.  Gross.  Sorry.
Then I stopped taking pictures of each coat because I was getting frustrated and thinking it would take me a MONTH to get this one white, so here's how it ended up.

Remember, I had to do the backs too so... 5 coats on the front.  5 coats on the back. argh!
sorry tiny spot of white branches on the bush.  Oops.

You can see how REALLY it could use one more coat-- but I just couldn't do it.  I called it "close enough".  I have more paint so someday when I'm feeling especially motivated I might finish 'er off.
And since they weren't PERFECT, I decided I needed to do something more to distract the eye so I made little paper liners for them-- just using scrapbook paper and a star template. 
In the end I only really like the finished product look of the blue one (ack-- the white one gives me a headache), but the good news is that the paper liners are just set in the bottom of the basket so I can pull them out really easily and swap them for new ones if I prefer.  This also helps them to be more "universal" so I can do Christmas liners for the red and white ones at Christmas time, or a sports theme/logo one for the blue basket during football or basketball season.

So that's the little story of how I turned $.10 cheep Easter baskets (see what I did there. cheep -- Easter. funny?  no?  whatever) into baskets that I can get a lot of mileage out of.
Happy Belated Easter.  :)

Tuesday, June 14, 2011

I finally cleaned off my dresser.

And I'm revealing my secret project from a while ago.  Remember this:
I finally had time to get back to it after the "my spray adhesive bottle doesn't have a spray nozzle on it" debacle.

Anyway...

The top of my dresser had been really messy for a while -- like REALLY messy  -- like so messy I was too embarrassed to take a before picture of it messy.   I FINALLY got all of  my jewelry organized which was most of the mess and got rid of TONS of receipts too (why do I hold on to this stuff ??-- grocery store receipts-- not even big purchase receipts-- I'm like a receipt hoarder).

LOTS of jewelry that I don't wear or haven't worn in a long time went straight to Goodwill.  I was able to consolidate most of the rest into 1 jewelry box (that I'd like to make over someday soon) BUT I still had a bunch of big, chunky necklaces that didn't really work in a "dainty" jewelry box.

I knew exactly what I wanted to make to hold these, but I couldn't find all the right materials until a few weeks ago.  So I finally made myself a place to store my necklaces and get them off the top of my dresser!

Here's what I did:

First I gathered all my materials--

  • a small cork board (this was the hardest piece to find-- big ones a plenty-- small ones not so much)
  • a fabric remnant
  • coordinating ribbon
  • matte white spray paint
  • spray adhesive
  • hot glue/hot glue gun (not pictured)
  • embellishments (as desired)

I watched Goodwill for weeks for a small cork board to refinish, but it just wasn't showing up for me so I had to buy one new.  All the big stores-- Target, Walmart etc.  only had large ones though.  Luckily I happened to find a small one (11" x 17") at JoAnn's Fabrics for $9.99 plus I had a 50% off coupon-- score!

I would've preferred real wood, but... this will do.
I covered the cork part to avoid overspray, but in hindsight I totally could have skipped this step.  I wasn't sure just how permanent the fabric would be, but it's pretty darn permanent so it really doesn't matter what the cork underneath it looks like.
 I'm a cheapo (obviously) so I bought the $1.97 spray paint at Walmart-- I didn't even spring for the $3.74 can -- and so far it seems that I DIDN'T need to spring for a more expensive can.  I'll let you know if anything changes though.
Cut your fabric to fit.  I cut mine just a tiny bit smaller because I knew when it was wet it would stretch a bit but you could also cut it a bit larger and trim it down with an Exacto blade if you prefer.
Make sure before you do the spray adhesive step that you cover the newly painted frame part-- otherwise you will forever have a sticky frame.
I used Elmer's Craft Bond-- #1. because it was the cheapest one I could find and #2 because it was the smallest can I could find and I wasn't sure how much I'd be using it for the future.  It was pretty fun to use though so ...
I  followed the instructions on the can- it took just a few minutes.  Then I added a ribbon accent around the edges with hot glue.  I've still got a thing or two to learn about hot glue as mine got a little thick in places-- if you look closely (note-- DON'T look too closely :)  ) you'll see small sections that are not as flat as I'd like them to be.

Then I just added a length of ribbon to the back with hot glue and a couple of fabric flower embellishments that I made and... there you have it!
ugh-- that corner... that's where I had the most trouble with the hot glue getting all gloppy on me. 

 One custom jewelry holder.  With some awesome fabric!  I'm kind of in love with it.