First of all I need to apologize for disappearing again for a bit-- we went "home" for the weekend and I got caught up in planning our get away and"stuff" so I neglected my little blog again. OK-- back to the party!
I'll try to make it up to you though with this post. It's one tutorial but THREE ways that you can accomplish custom party blowers for your next party. First I'll give you the tutorial for the way that I ultimately decided to make my custom party blowers.
#1.
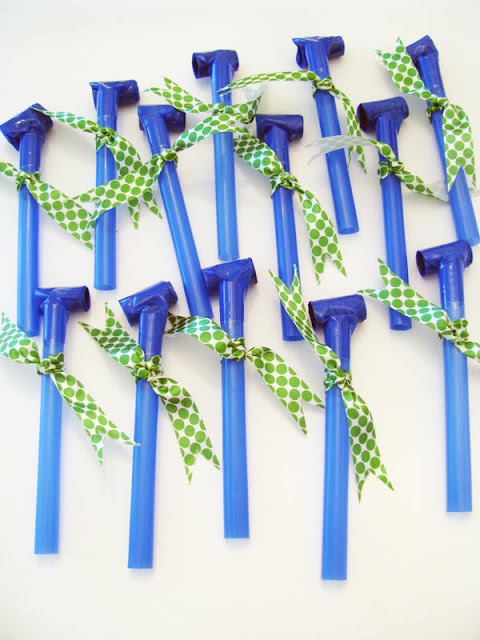
So... I bought these guys at the Dollar store-- again, knowing I wasn't going to keep them looking like this. I chose these specifically though because the blower part was blue-- within the party color scheme.
Then I grabbed some ribbon that I bought for the party. I love the polka dots on it! If you look closely you'll see that I got a number of rolls of this ribbon on clearance after St. Patrick's Day with the party in mind - a good 2+ months before the party.
Cheapskate tip: the earlier you come up with a theme, the more time you have to look for great deals on supplies-- each of these rolls of ribbon cost me just $.50 on clearance after the holidays.
First I took off all the card stock circles and cut the ribbon into 8" lengths.
For 12 of these blowers, I only used one 3 yd. roll. 2 pkg. blowers and 1 roll of ribbon. Total cost: $1.50 .Then I cut all the "tails". I think this detail is really special-- others might not even recognize it as special, but it's just one of those things that I think really makes this project look finished.
Tie ribbon in a simple knot around the blower part and... viola!
Before and After:
And some more glamour shots:OK-- let's be real now. I LOVE these. And I think they are SUPER cute, but the main reason I did them this way is that I ran out of time. These were a happy accident. A "shoot-- I want to create custom party blowers, but I ran out of time" accident. I love it when it works out! And I may use this accident technique for future parties as well!
Here's how this project started however.
#2. Originally I was going to trace the pattern of the circles that came on the blowers and cover them with scrapbook paper and enbellishments, but... the place where I got stuck was with what a pain it was going to be to cut out the holes to insert the blowers though. If I decided to do these more often, I bet there is a special hole punch that you can purchase that would make large enough holes, but, I'm sure it would be expensive AND...there was a second issue too.
I think these circles are just too big! They seem a little excessively large to me so that would've meant creating a whole new template using this one as a guide-- and I just didn't have the time for that.
So...the project morphed into this:
(note-- the following photos are from my trial run-- I didn't take it beyond this step because I wasn't overly thrilled with the end result). I think my IDEA is 'ok' it just needs some refinement. If you choose to try option #3-- please keep this in mind.
#3.
The next issue was how to get the blower though the circle. I cut slits in two opposite edges of the circle.
 |
| "template" prior to scrapbook paper version |
This worked fine, but.. I just wasn't loving the end product. Perhaps if they were square it would look better???


So the morals of this story are that sometimes it take a lot of forethought to get good deals and trial and error can sometimes lead to a great discovery of a faster, easier and cuter way to make your party special!
I love these! ..... a lot.


1 comment:
I am going to do this last solution for my son's upcoming party. I have tons of punches already. Thanks for doing the trial and error work!
Post a Comment